This pie combines a flaky crust with a crunchy streusel topping. It’s a treat that never fails to impress. You can find trusted recipes on Allrecipes, Food.com, and food blogs. They all agree on the key ingredients: tart apples, a mix of sugars, flour, lemon juice, warm spices, and a cold-butter crumble.
One 9-inch pie makes about 8 slices. Prep time is 30–45 minutes. Bake at 375°F for 50–60 minutes. Total time is around 1 hour 30 minutes. Each slice has about 407 kcal, with 3–4 g protein and 3–4 g fiber.
Key Takeaways
- The homemade dutch apple pie is a comforting, crowd-pleasing dessert suitable for holidays or weeknight baking.
- Tart apples (Granny Smith or similar) are core to the classic dutch apple pie flavor.
- Prep time is generally 30–45 minutes; bake at 375°F for about 50–55 minutes.
- A single 9-inch pie yields roughly 8 slices; calorie counts vary by recipe.
- Core components—crust, apple filling, and crumb topping—remain consistent across reliable recipe sources.
Why You’ll Love This Classic Dutch Apple Pie
This dessert is both familiar and special. It combines warm apples, a buttery crust, and a crisp streusel top. It’s a comforting bite that everyone loves.
Bakers often say it’s the best dutch apple pie for gatherings.
Comfort dessert that appeals to everyone
This pie is perfect for cozy nights and big holidays. It’s easy to make with ingredients you likely have. The sweet and tart flavors make it a favorite.
Many say it’s an authentic dutch apple pie that they always ask for again.
Buttery crust and crumbly streusel topping
The texture contrast is what makes this pie stand out. A flaky crust holds tender, spiced apples. The streusel adds caramelized sweetness and crunch.
This mix of textures is why many prefer it over a double-crust pie.
Perfect for holidays and everyday baking
Use this pie for Thanksgiving or a simple weeknight treat. You can choose a store-bought or homemade crust. It’s still the best dutch apple pie.
The recipe is easy to scale and freezes well for later.
Ingredients for the best dutch apple pie recipe
Choose apples that stay firm and taste bright. Granny Smith apples are great for their tartness. Honeycrisp or Braeburn apples add sweetness. You’ll need 5–8 cups of peeled, cored, and sliced apples for the filling.
For the filling, you’ll need granulated sugar, brown sugar, flour, lemon juice, and spices. Use 1/2 to 3/4 cup of granulated sugar and 1/4 to 1/2 cup of brown sugar. Add 2–4 tablespoons of flour, 1 tablespoon of lemon juice, 1/2 to 1 teaspoon of cinnamon, and a pinch of nutmeg.
The streusel topping is crucial for texture. Mix flour, brown sugar, and granulated sugar with cinnamon. Use 1/2 to 1 cup of flour, 1/2 cup of brown sugar, and 1/2 cup of granulated sugar. Add 1 tablespoon of cinnamon for a strong spice flavor. Cut in cold butter until it’s coarse like sand.
Cold butter makes the streusel topping light and sandy. It melts into pockets as the pie bakes. Some prefer room temperature butter for a chunkier crumb. For a crisp topping, keep the butter cold and work fast.
Use a single 9-inch bottom crust for a traditional look. Store-bought crusts save time. Homemade dough adds flakiness and control over ingredients. Keep ingredients cold, handle dough gently, and blind-bake if needed.
Kitchen tools and equipment you’ll need
To make a great homemade Dutch apple pie, you need the right tools. Having them ready before you start saves time and prevents mistakes. It also helps you make a cleaner pie by assembling the filling and crumble smoothly.
Essential tools
First, grab a standard 9-inch pie pan or pie plate for even baking. Use a large mixing bowl for tossing the apples. A medium bowl is best for the crumb topping. Make sure your oven is preheated to the recipe’s temperature, usually 375°F or higher for browning.
Helpful tools
An apple slicer and corer make prep faster and give you even wedges. A sharp paring knife or vegetable peeler is great for precise apple slices. For the crumble, a pastry blender is best for mixing cold butter into flour and sugar. But, two knives or a fork will work too.
Have a slotted spoon ready to scoop apples into the crust. This helps avoid soggy bottoms and keeps your pie’s filling firm.
Baking tips and protection
Put a baking sheet under the pie to catch drips and make cleanup easy. Use parchment paper or a folded parchment to trap heat for a golden topping. Cover the crust edges with foil or a pie shield if they brown too quickly.
A pastry brush is optional for an egg wash to deepen the color. With these tools, you’ll confidently make your Dutch apple pie every time.
Preparing the apple filling for a delicious dutch apple pie
Begin with crisp apples and a clear plan. You’ll need 5–8 cups of peeled, cored, and thinly sliced apples. This amount fits a 9-inch pie pan without overcrowding. Thin slices ensure the fruit and crust cook evenly, making the filling tender.

dutch apple pie filling
Use an apple slicer to cut the fruit into quarters. Then, slice each quarter thinner with a knife. Uniform slices mean every bite is the same. For a firmer bite, choose Granny Smith apples. For sweetness, add Honeycrisp or Fuji.
Coat the apples in a mix of granulated and brown sugar. Add 2–3 tablespoons to 1/4 cup flour to thicken. Stir in 1 tablespoon lemon juice, 1/2 to 1 teaspoon cinnamon, and a pinch of nutmeg. This mix creates a balanced filling that thickens as it bakes.
Let the coated apples rest for at least five minutes. This allows sugar to draw out juices. For the best results, refrigerate them for 1–2 hours. This step concentrates flavors and prevents a soggy crust.
When ready to assemble, use a slotted spoon to add the apples to the crust. Leave excess liquid behind. This keeps the crust crisp and the filling rich and saucy, just like a traditional dutch apple pie.
Making the crumble topping for an authentic dutch apple pie recipe
First, chill a stick of unsalted butter and cut it into small cubes. Use a pastry blender, two knives, or your fingertips to mix the butter into the dry ingredients. Aim to coat each piece so the topping browns evenly and the filling stays moist.
The mix should resemble coarse sand with pea-sized crumbs and finer dust. If you see large clumps, press them down gently. If you see dry powder, fold it back into the bowl and coat it with a little more butter.
Here are practical technique points to keep your topping perfect:
- Use very cold butter for distinct crumbs that hold their shape.
- Room-temperature butter gives a softer, almost shortbread crumb if you prefer that finish.
- Work quickly so the butter stays cold; warm hands will turn crumbs into paste.
To prevent burning and to ensure even browning, spread the crumble evenly over the apples. Leave any very fine, dry dust in the bowl rather than on the pie; uncoated flour can scorch.
Shield the crust edges with foil or use a pie shield if the topping nears a deep brown before the filling finishes cooking. Bake the pie on a rimmed baking sheet to catch drips and to promote uniform heat beneath the pan.
If you want the best dutch apple pie, balance sugar and butter so the topping crisps without becoming greasy. Small experiments with brown sugar or rolled oats will change texture but keep the same core technique.
| Step | Action | Why it matters |
| 1 | Cut cold butter into cubes | Cold butter creates pea-sized crumbs that hold structure during baking |
| 2 | Work butter into dry mix until coarse sand texture | Even coating prevents floury spots and promotes uniform browning |
| 3 | Leave fine dust in bowl | Avoids burning and keeps topping crisp |
| 4 | Distribute crumble evenly over apples | Ensures consistent color and crunch across the pie |
| 5 | Use foil shield and rimmed baking sheet | Protects crust edges and provides even heat beneath pie |
Assembling your homemade dutch apple pie
Start by placing your rolled single bottom crust into a 9-inch pie pan. Press the dough into the corners and trim any excess. Crimp the edges to your liking.
If you used a store-bought crust, let it relax for a few minutes. This helps prevent it from tearing when you fit it into the pan.

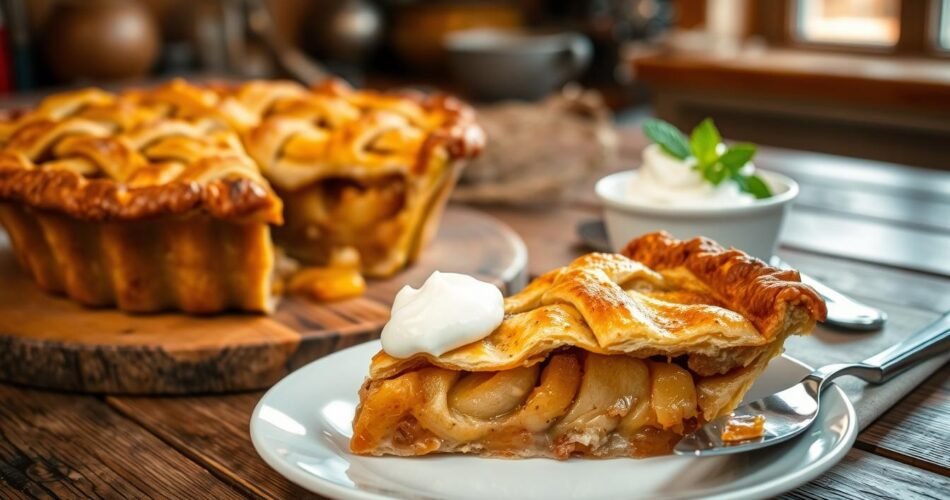
homemade dutch apple pie
After the apple filling has rested, use a slotted spoon to scoop the slices. This keeps the bottom crust from getting soggy. It’s a trick many bakers use for a reliable pie.
Pack the apples into the crust until it’s full. The filling will settle as it bakes. If some juice remains, that’s okay for an easy pie recipe.
Sprinkle the crumble topping over the apples with a light touch. Leave the fine powder in the bowl to avoid dry spots. Press any large crumbs together gently to ensure even browning.
Put the pie on a baking sheet to catch any leaks. This makes clean-up easy and protects your oven from drips.
Baking instructions for a traditional dutch apple pie
Preheat your oven before baking. This ensures the filling starts setting as soon as the pie goes in. Most cooks bake at 375°F for 50–55 minutes. This method gives you tender apples and a crunchy topping without burning the edges.
Oven temperature and bake time
Set the oven to 375°F and bake for 50–55 minutes. Check the pie after 40 minutes to avoid over-browning. If you prefer a hotter method, start at 425°F and cover the pie for a while, then adjust as needed.
Protecting crust edges and topping
If the crust edges brown too fast, cover them with foil or use a pie shield. You can also wrap the pie in parchment for even baking. If the streusel browns too quickly, cover the top until the filling is done.
Resting time for clean slices
Let the pie rest for at least 15 minutes after baking. This allows the filling to set and makes for cleaner slices. Cooling for 15–30 minutes is best. Cooling for up to an hour helps the topping stay crunchy and makes storage easier.
Serving suggestions and variations for a delicious dutch apple pie
Serve your pie warm to enjoy the scent of cinnamon and soft apples. A scoop of vanilla ice cream or a dollop of whipped cream adds a cool contrast. It highlights the buttery crumble and the bright fruit flavors.
For firmer slices, let the pie come to room temperature. Warm individual portions in a 350°F oven for five to ten minutes. This makes the topping crisp and the filling slightly gooey.
Easy swaps let you customize the flavor and texture. Mix Granny Smith with Honeycrisp apples for a balance of tartness and sweetness. Add more cinnamon or a pinch of nutmeg for a warmer taste. A tablespoon of maple syrup in the filling adds depth.
Add chopped walnuts or pecans to the crumble for a crunchy texture. A light drizzle of caramel enhances the caramelized notes without overpowering the apples.
Try dutch apple pie variations by doubling the ingredients. Make Dutch apple pie bars, quick bread, or cookies for potlucks and lunchboxes.
When making bars or bread, press the crumble into the pan for a sturdy base. Sprinkle extra streusel on top. For cookies, sandwich a small scoop of filling between two crisp rounds. Finish with a dusting of cinnamon sugar.
These serving ideas and dutch apple pie variations keep the classic spirit alive. They offer options for every occasion. Use them to make the most of your baking, whether you serve a single pie or a tray of treats.
Storage, freezing, and make-ahead tips for homemade dutch apple pie
Keeping your pie fresh is key. You can store it in the fridge, freeze it, or make it ahead of time. This way, you can enjoy a delicious pie without the stress of last-minute baking.
Refrigerator storage: Cool the pie down before covering it. Use plastic wrap or foil to prevent moisture. A pie stored this way will stay good for 5–7 days.
Freezing a baked pie: Cool the pie completely before freezing. Wrap it in plastic wrap and then foil. Frozen pies can last up to 3 months. Just thaw it in the fridge before baking again.
Freezing unbaked or make-ahead assembly: Make the filling and topping a day early. Store them in the fridge. For longer storage, assemble the pie and freeze it. Bake it straight from the freezer, thawing it first for the best results.
Reheating tips: Warm slices or the whole pie in a 325–350°F oven. It takes 15–25 minutes for slices and longer for a whole pie. If the topping gets too brown, cover it with foil. Oven reheating is better than microwaving for keeping the streusel crisp.
| Task | Method | Time/Temperature | Notes |
| Short-term storage | Cover and refrigerate | 5–7 days at 40°F or below | Cool to near room temp before covering to avoid soggy topping |
| Freeze baked pie | Wrap in plastic, then foil | Up to 3 months | Thaw overnight in refrigerator before reheating |
| Freeze unbaked pie | Assemble, wrap tightly, freeze | Up to 3 months; bake after thawing | Allow even thawing in fridge for best crust bake |
| Reheat slices | Oven on baking sheet | 325–350°F for 15–25 minutes | Tenting with foil preserves topping color and prevents burning |
| Revive crispness | Reheat in oven, not microwave | 325–350°F until warm | Oven restores firm bottom and crisp edges after refrigeration |
Conclusion
Your homemade dutch apple pie recipe is a warm, classic dessert. It has tart, tender apples and a buttery, crumbly streusel. It’s perfect for holidays or a simple weeknight treat.
For the best dutch apple pie, pick apples like Granny Smith, Honeycrisp, or Braeburn. Let the filling rest to get rid of excess juice. Use cold butter for a good streusel texture. Bake at 375°F for 50–55 minutes.
Make this authentic dutch apple pie recipe your own. Try swapping apple varieties, tweaking spices, or adding nuts. You can even turn the crumble into bars or quick bread. Follow the recipe card for ingredient amounts and cooking times. Include the meta title and meta description at the top of your page to complete the post.